Category Archives: Metro Artist

Parent Category

Blue Eyed Alien – Paint Daily

Canadian Blogger eh!

June 18 2015

I am thankful for dinners with family.

Category Painting

I paint everyday.   I usually get up at five and paint for one to two hours. I haven’t really put together a “painting” per say; but I do paint daily.

I paint with acrylic paint, watercolour paint, and or ink.   I use 8.5 by 11 inches, 110 pound card stock paper, or 100 pound Bristol / vellum Bristol in various sizes, or 140 pound watercolour paper in various sizes.

I research what to paint the day or night before.   This avoids looking at a blank page not knowing where to start. I do my research on the Internet, books, magazines, videos and other sources. I keep my eyes open as I go through my day on what I could paint.

When I first started painting, I started out using low-grade paint and brushes. This is a mistake and can be very disappointing.

Sometimes I start painting and whatever flows onto the paper is what I paint. Other times I find a picture or painting and use that as a reference point.   One of the hardest parts for me is how or what to paint in the background and still have the focus painting shine through. Sometimes I paint onto a blank page with nothing really in mind and use that painting as the starting point or background for a future session.

Really a good painting class would be beneficial. Sometimes I sketch out what I’m painting and sometimes I just paint or ink up the brush and get started.

Currently I paint faces.   I read a few books on anatomy and painting portraits and find the more I read, the more I need to read. I am constantly studying if you will on how to do things better.   All that needs to be taken into consideration, things I never thought about before. So many things to learn, so little time.


This is one of my first paintings.   Titled “Blue Eyed Alien” 2015

1502005


Watercolour paint on 140 lb  9in X 12in watercolour paper


Lesson Learned:

  • Never start with a blank paper – have something in mind
  • If you don’t have anything in mind, get paint on your brush and get started – don’t waste time looking at that blank page
  • Check the quality of the paints and brushes before purchasing a paint kit
  • Pay attention to details, try to paint what you see or feel – not what you think you see


Final thoughts:

Buy the best quality paint and brushes you can afford.  Do your research on the Internet and or in painting books and consult the individuals in the art stores on what quality of paint and brushes fit your needs.

Do some research on what to paint before you get your brushes out.

I never try to copy a painting, I just study it to come up with ideas and hopefully get some insight into creating.

Draw and or paint daily!

It’s great if others like your paintings, but for the most part paint for yourself. Paint because it’s one of your passions, hours roll by and you get totally absorbed in it.

Beacon Tate


I love the zoo!

Canadian Blogger eh!


June 15 2015


I am thankful for the beauty of bare leafless trees with a low-lying fog backdrop in the early morning!


Category Photography

I love to take pictures. One day a friend and I went to the zoo. We walked around for hours. I did manage to get a few interesting pictures. These pictures were taken with my film camera and a 200 mm telephoto zoom lens.


I know it not politically correct these days and totally not fair to the animals. But I most likely would never have gotten these photos of these beautiful creatures had I not been at the zoo.


The setting was a large fenced field with a huge mud puddle. As we walked by we thought it was just a field with a mud puddle and really did not notice the hippo until she moved. With my telephoto lens I was able to get a nice shot.


The next two pictures I took through  link fences. If I recall correctly there may have been double fences.


I just love the pose of this stately black bear, just a lazy day in the sun.


This majestic Jaguar sitting so proudly!   What beautiful animals!


Beacon Tate

Tree Quilt

Canadian Blogger eh!


June 13 2015


I am thankful for the sunrise. Beautiful day on the west coast!


Category – Sewing


Tree Quilt


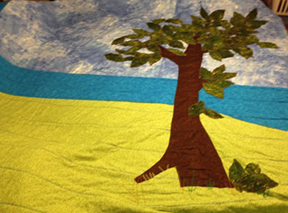
I decided I would like to make a queen size quilt for my son. I wanted to make something that would fit into his life right now. I searched the Internet for different quilt patterns, pictures, and ideas. I found a small quilt with a beach, water, sky and a tree.   My next decision was should I make the tree look as real as possible or go the other extreme and make it look like a cartoon.

I went to the fabric store and talked to a few people. I have never made a quilt this large before.   I had made kids quilts when my nieces, nephews and my children were younger. It seemed like people were buying the fabric with the scene already on it, this did not seem like much fun. I wanted to make something I created myself, not something that a cloth maker had produced. I was also told I could put it together and the fabric store knew a lady that would do the actual quilting.   I wanted the full experience; I wanted to do it myself.

Whenever I make something I think about it, sometimes for weeks, I work it out in my head. Once the thought process was done I headed on down to the fabric store.   That was an eye opener quilting is expensive!

I found it rather difficult working with such large amounts of fabric. Back to the fabric store, there must be tools available. There are things that look like those hoops you put on your pant leg when you are riding a bike so your pant leg does not get caught in the spokes of your bike tire. You roll the fabric up and clip it in these hoops, I got six and found a couple of those bike hoops at home. I was set. Notice the top is rolled up in those bicycle pant leg hoops.

I found it hard to push that much fabric around and it was heavy. You can actually buy quilting gloves with flexible fingertip grips; go figure – I had so much to learn. I always thought if there is a need someone probably thought of it already.

My sewing machine is a machine built for quilting but not one of those expensive ones; mine is one of the cheaper ones. One thing I realized is the distance from the arm to the needle makes a big difference when you have such a large amount of fabric. Oh, why did I cheap out on the sewing machine??

I was also told to quilt from the middle and work to the outer edge. Another question, how do you hold the 3 pieces together – the backing, batting, and top? No easy task.   Safety pins!

I placed the tree unto the fabric before I layered the batting and the back.  I pinned the leaves in place with straight pins and just started sewing them on.  Some of the leaves got displaced as I was sewing, I just picked them up and sewed them on.  I thought it turned out  good.

This is the queen size quilt on my dining room table. I did some machine stitching to add the effect of grass in green, yellow and gold. The back is the same fabric as the water. I love the fabric I used for the sky. I also quilted ten-inch rows across the fabric. It probably would have looked better with free stitch quilting – but I had never done that before and will need to practice. Another consideration was the tread – different colour on the front and back or the same??

treequilt


Lessons Learned:

  • Buy a sewing machine meant for quilting, if you plan to quilt large projects
  • Check out the quilting shop for accessories (whatever your issue, there’s likely a solution):
    • Quilting clips
    • Quilting gloves
  • Safety pins is one solution for holding the pieces together
  • Quilt from the middle and work to the outer edge
  • Your batting and back fabric should be about three inches on all sides bigger than the quilt front


Final thoughts


I had a lot of fun making this quilt. I think it would be beneficial to take a few lessons from a quilt shop, to learn quilting techniques that would make it easier.


Beacon Tate


Men’s knitted sweater on circular needles

Canadian Blogger eh!

June 12, 2015

I am thankful for this windy day!

Category Knitting

Men’s knitted sweater – circular needles


Recently I decided knitting with circular needles was the way to go. Over the past year or so I have made many pairs of socks, a man’s sweater, several scarfs, gloves, toques all on circular needles. I had never used circular needles before except to make afghans.


I was determined to knit a sweater on circular needles having never done it. I thought it was a good idea. While I like the fact when you are done there are no seams to sew, I did not like not being able to measure the pieces for size against the person you are making it for, as I went along.


I searched the Internet for ideas, a great tool! I actually found a circular needle pattern on Pinterest.  By the way I never take a pattern, recipe and do exactly as told, I only use it as a suggestion. I am a very loose knitter; interesting my mom and I can pick up each other’s knitting and carry on as we have the same tension.


I choose a variegated 100% Acrylic medium (4) weight yarn.


I always have two or three knitting projects on the go, as I get bored with working on the same project day in and day out. I always buy two pairs of the same size circular needle, a requirement as far as I am concerned for small projects like socks, as it makes it easier with two needles. One of the problems I have encounters is twisting the stitches and ending up with the round actually having a twist in it – not good!

Circular needle Men's Sweater
Circular needle Men’s Sweater


Close up
Close up

Lessons Learned:

  • Ensure the dye lot number is the same on each ball of yarn


  • Always knit a swatch to ensure you can achieve the correct gauge as required in the pattern
  • Be careful not to twist when joining the circle of stitches


Final thoughts:

I liked the fact the whole project was knit on circular needles because for the most part you are just knitting (instead of knitting and purling). I also liked the fact there were minimal seams to sew together. I did not like not being able to measure the actual sweater pieces against the individual I was making the sweater for. I do not like how the collar sits.   I plan to change the collar.


Beacon Tate